How to install WordPress youtube
- Download the latest version of WordPress from WordPress.org.
- Upload those files to your web server, using FTP.
- Create a MySQL database and user for WordPress.
- Configure WordPress to connect to the newly-created database.
- Complete the installation and setup your new website!
and Second Type
How To Install WordPress in Five Steps
-
- Login top your C panel Search Softacu
- Softaculous App Installer
- Install WordPress
- Login To admin Panel
- enjoy your website changes
How to Install WordPress: A Guide for a Novice
WordPress is an open-source, free software considered to be flexible and simple to install. Keep reading if you’re here to learn how to install WordPress. This guide, however, is for installing WordPress on a local (Windows and Mac) shared hosting machine. Refer to this article for Installing WordPress on VPS.
Let’s get started, with that being said.
How to Use the Auto Installer to Install WordPress
Choosing a host that does it for you is the best way to install WordPress. Many hosts find this process a breeze, but thanks to its one-click installer, we will show you how setting up WordPress on Hostinger is a fast and simple process:
- Sign in to your CPanel and under the Website section find the Auto Installer.
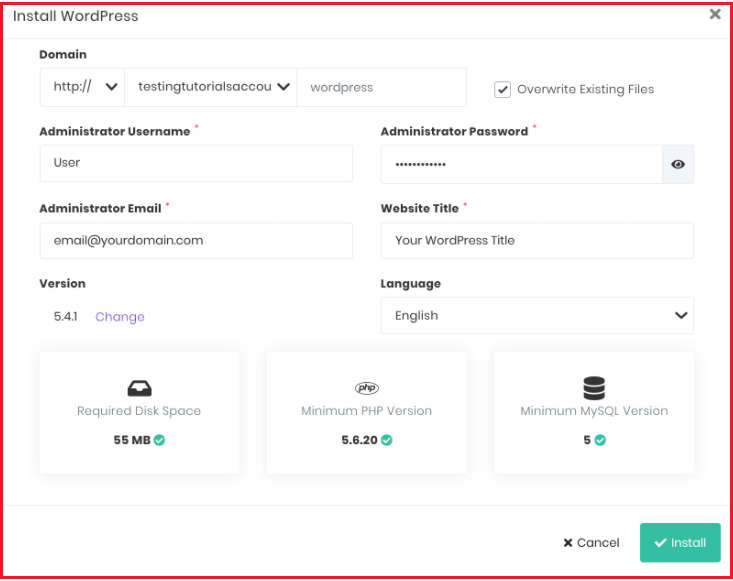
- Click the WordPress icon, fill in the fields needed, and then click Install.
It’s that! You can now log in to the Administrator dashboard by selecting WordPress from the Actions box in the Installed Applications List and start building your website.
How to Manually Install WordPress
You can install WordPress manually if the automated WordPress installer does not seem to work, or if it is not available on your hosting system. For a simple installation method, follow the steps below.
Preparing the WordPress Install
Let’s first set up a few items before we begin the installation process:
Download and extract the new WordPress update.
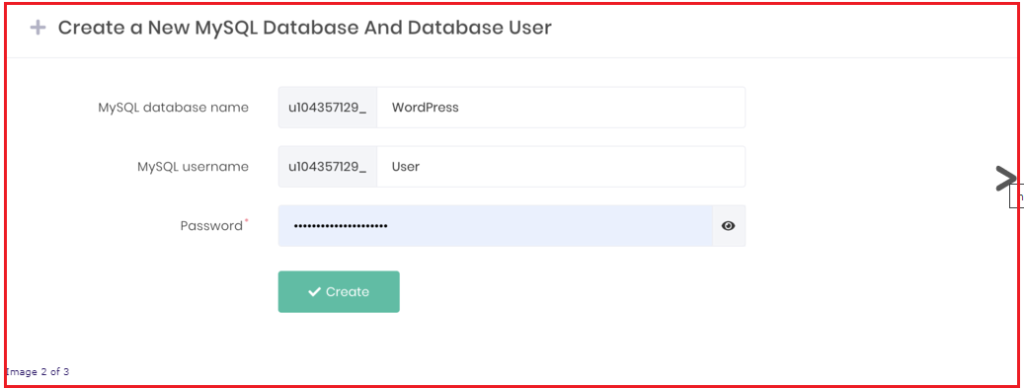
Next, we need to build users and a database. So, log in to your CPanel and under the Database section, go to MySQL Database. Press Build, after filling in the appropriate fields.
Wp-config.phpp customise
This file contains information about the database and helps WordPress to know which database to extract information from. In File Manager, you can find the wp-config.php file in the folder where WordPress is installed. For configuring your WordPress files, follow the steps below.
Log in to the CPanel file.
Click on the File Manager in the Files section. When the box opens, select the WebRoot option and select the Display Hidden Files box, then press Go.
Click and expand the public HTML file and open the folder that contains the installation for WordPress.
Locate and rename the wp-config-sample.php file to wp-config.php, then right-click and select Code Edit. When opened, look for the data that says:
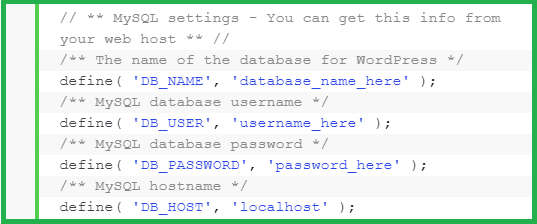
Replace the database name with the name of the previously developed MySQL database.
Replace the username you created with the username here and the password you created with the password here.
When the editing is completed, select Save Changes and close the file.
Finally, by using the File Manager or an FTP Client like FileZilla, upload the extracted files to your hosting account into the public HTML file.
WordPress Installation
We can continue with the installation process now that we have the planning stage covered. To open the setup tab, access your domain name.
The 5-minute installation wizard of WordPress only has five measures in total:
Choose your language and push the Continue button.
WordPress will ask for the MySQL details to be collected. Since you have them already, click Let’s go!
Enter the credentials for the MySQL database. The Database Host and Table Prefix fields can be left as they are. Adjust the latter only if you want several installations to run within one database. Select Submit. Select
WordPress will check whether you can connect to the MySQL database that you have developed. If there are no errors, pick Run the installation.
Fill in the website and information about the administrator. To finalize the process, install WordPress.
In order to enter the WordPress admin area, you can now press the Login button.
How Locally To Install WordPress
If you install WordPress locally, before implementing them on your live website, you will have an amazing environment to try out any improvements. On Mac and Windows, let’s look at the ways to do this:
WordPress Installation on Mac Using MAMP
We will be using MAMP (Macintosh, Apache, MySQL, PHP) in order to install WordPress locally on a Mac computer.
You can build a PHP and MySQL server on your computer using this method. In other words, for testing purposes, it provides all the required ingredients to operate a WordPress environment locally.
Installing MAMP and Database Development
We have to prepare the server and the database first, similar to the manual installation on shared hosting:
On your Mac, download and install the new version of MAMP.
The installation wizard is fairly straightforward and requires no custom settings. Once the setup is complete, continue.
Database development by accessing the Database tab.
Insert a new database name-> Build. For this case, we will use w0rdpr3ss as our name for the database.
It’s that. On a Mac OS, we’re able to set up WordPress locally.
Reseller Hosting India With WHMCS
Doing the installation of WordPress
If you haven’t already, download and extract WordPress from it. In other words, unpack the WordPress kit on your local machine. Skip to the next stage if you are using FTP. However, if you have access to a shell on your web server, use the Download command:
14 Affiliate Marketing Tips to Boost Income in 2020